Monday, May 20, 2024

Stenciled Die Cut as Card Background


Hello! Welcome back to my blog. Today's card features products from Kat Scrappiness. I created a card before using the same stencil I used on this card. I only used the stencil since that is the only product on this line that I have. I fussy cut the flowers for that project which was not a lot of trouble. I finally invested on the matching die and I am glad I did. Most of the time, I use the stencil first before die cutting it with the coordinating die. With this coordinating products, cutting the paper first with the die cut before stenciling it made the ink blending easier. It was easier to line up the stencil to the die cut. The negative die cut was very helpful as a placement template to keep die cuts in place while stenciling.

I die cut several pieces of the smaller daisy on the set. I wanted the daisy to be white so I skipped stencil #1 and started blending ink on stencil #2. (The number of the stencil is etched on the upper right corner of the stencil.) I used a light gray colored dye ink to add the shadows of the daisy.

I used a cream colored dye ink for the daisy center and a light yellow dye ink for the highlights. I used the KS 1/2" Stencil & Ink Soft blending brush for the highlights. Using a mini blending brush on very intricate areas gave me some control on the amount of pressure to apply on the stencil because of its small size.

I trimmed a mint cardstock at 4 1/4" x 5 1/2". I embossed the KS Buffalo Plaid Background Craft Die on this to add some interest on this otherwise plain background.

I arranged the daisies on this panel and adhered it with a glue. I trimmed off the excess that is hanging over the panel. 

I adhered several KS 6mm Clear Flat Flower Sequins in between the daisies to fill in the gaps. I love these sequins! It picks the color of the cardstock it is adhered to. 


I stamped the sentiment on one of the flowers using a dark gray ink. The sentiment is from the KS Quokka Flowers stamp set. 


I hope you like today's project and that you give this technique of die cutting first before stenciling a try. Thank you for visiting my blog. Have a blessed, brilliant and creative day! 

Maria Giselle B.

I added below links to the Kat Scrappiness products I used on this card. There will be no additional cost to you should you decide to purchase any of these products. While you are at the Kat Scrappiness website, do check out their wide array of products especially the exclusive Kat Scrappiness products. Enjoy!


Saturday, May 18, 2024

Trophy Card


Hello! Welcome back to my blog. Today's card was created with my 3rd son in mind. He is graduating high school tomorrow. 2024 has been a good year for him with all the blessings he received this year. Congratulations, Yrwin! 

Also, I created this to join in the Lawnfawnatics challenge Inspired By. I love to stitch so I am so excited when Lawn Fawn created a line of products with stitching opportunities. I am very thankful to their designer. Chari Moss, for creating and sharing embroidery patterns. Her card using the Embroidery Hoop Star Add-on inspired me to use this die to create this project since I have not used this die yet. Although I did not do the same stitching as hers on my star, I want to show another way of using this star embroidery die. 

I am using the following Lawn Fawn Products for today's project:
  • Embroidery Hoop
  • Emroidery Hoop Star Add-on
  • Circle Stackables
  • Lucky Star
  • Platform Pop-up
  • #Awesome 
  • Flippin' Awesome
I used a string art design on the star, stitching back and forth, sideways, diagonally, making sure that the cardstock panel is covered with stitching. Although I did a back stitch on the star prior to doing the string art, I did another back stitch of the star using a gold metallic floss.
a

Would you believe that the circle frame I used for the this trophy card is the embroidery hoop die cut? I used the prongs of the embroidery hoop to anchor the frame to the platform. 


This trophy card is mailable and great for display. Please enjoy the short video below showcasing the interactive feature of this card.


Thank you for visiting my blog. Have a blessed, brilliant and creative day!

Maria Giselle B.

I am sharing this creation at


Wednesday, May 15, 2024

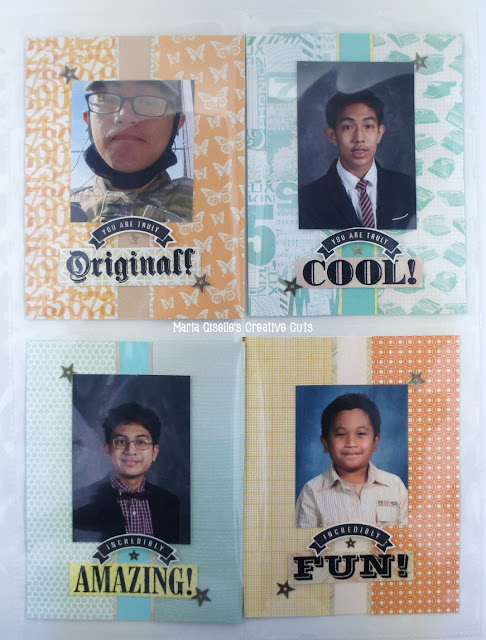
Sketch Inspired Pocket Page Layout (Craft My Stash #15)


Hello! Welcome to another post in my Craft My Stash series. Aside from using my stash, this project was inspired by the Scrapbook and Cards Spring Issue Sketch Challenge. This project also reminded me of a previous scrapbook layout I created for a challenge (Create Your Own Background for a Scrapbook Layout). That layout also featured my sons. It was created three years ago. See how my sons have grown.

The products I am using for this project are:
  • Studio Calico Heyday 6x6 paper pad
  • Close To My Heart You Are stamp set.
I trimmed several cardstocks at 4 1/4" x 5 1/2". This will serve as the main panel for each mini layout. 

I trimmed different patterned papers at 1 3/4" x 5 1/2". I adhered this to each side of the cardstock panel. 

I trimmed a sliver of another cardstock and adhered this to the sides of the cardstock to create a contrast border.

Using this same cardstock, I heat embossed a sentiment from the stamp set. I cut this using a craft knife.

I stamped the banner sentiment using Versafine Onyx Black ink. I fussy cut this banner leaving a small white border around it.

I adhered the photo, then the sentiment. I adhered the banner using foam tape. I adhered some star sequins for a little embellishment.

Using a paper pad made the creation of this layout quick since patterned papers in a collection coordinate with each other leaving the guess work to a minimum. 

Creating pocket page inserts is like creating a scrapbook layout in a size of a card. The downside of this is the limited amount of photos you can use due to its size limitation.

I really enjoy sketch challenges! If you have been following my blog, you know that this is my most favorite of all challenges. 

Thank you for visiting my blog. Have a blessed, brilliant and creative day!

Maria Giselle B. 

I am sharing this creation at


Tuesday, May 14, 2024

Photo Inspired Slimline Card


Hello! Welcome back to my blog. I created today's project inspired by the photo and sketch on this week's Inspired By Challenge. Best of all, I was able to incorporate stitching on this project which is a favorite technique of mine. 

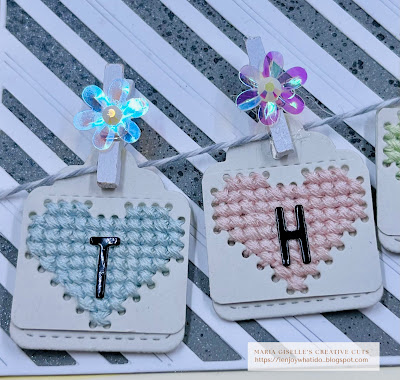
The stitching holes were created with the use of a die from the Waffle Flower Stitchable Hearts die set. I die cut the hearts on a light gray cardstock. The die creates a row of three stitchable hearts. I trimmed the hearts apart so I can adhere a heart to a tag. I stitched each heart with a different color of DMC embroidery floss, following the colors of the hanging clothes on the inspiration photo.

I die cut the tags on the same light gray cardstock. The tag die is from the Lawn Fawn Tiny Tags die set.  

For the card panel, I die cut a white cardstock using the Pinkfresh Studio Slim Fancy Diagonal Stripes die.  I backed this with a dark gray cardstock which I spritz with pearlized water first. After I dried this with a heat gun, I spritz the same panel with a black Mica spray. I dried this again with a heat tool. I adhered the striped die cut to this shimmery panel. I trimmed off any excess. 


I cut a gray-white twine long enough to cover the width of the slimline panel. I threaded the twine through the holes of the tags. I adhered the ends of the twine to the back of the slime line panel. 

I arranged the tags on the panel. I adhered the tags to the panel with a foam adhesive. I added a white mini clothespin on top of the tags. I made these clothespins secure to the tag and the panel with the use of a glue gun. I adhered a floral sequin on the top of the tag. I adhered a white gem on the center of the floral sequin. 

I die cut the letters on a black mirror cardstock using the alphabet die from the SugarPea Designs Message Letter Board die set. I adhered each letter on top of each stitched heart.


I hope you like today's project. Thank you for visiting my blog. Have a blessed, brilliant and creative day!

Maria Giselle B. 

I am sharing this project at


Sunday, May 12, 2024

Split Stamped Image


Hello! Welcome back to my blog. Before anything else, I would like to greet all the mothers a Happy Mother's Day! This is my tribute card to me and to all of you out there on this special day.

I am using the Blank Page Muse Floral Spray Sunflowers Chrysanthemum Line Art Rubber Stamp on today's project. This is a large stamp that measures 4" x 5". It fills up a card front very easily. Today's card shows another way of using this stamp set.

I stamped the image on the center of a 5 1/2" x 4 1/4" Bristol Vellum paper using Versamark ink. I prepped the area with an anti-static tool before stamping the image to control any stray embossing powder which I poured over the sticky impression. The embossing powder I used is the Altenew Peach embossing powder. 

I colored the image using Altenew Woodless Watercolor pencils. I added the concentrated pigment on the center of the image and spread it off to the edges using a watercolor brush to achieve a pastel color.


Once I've colored the entire image. I cut the panel in half on the center both lengthwise and crosswise creating four mini-panels. I rotated the panels so that the embossed image will be at the outer corner when adhered together. 

I flicked the same pink ink I used for the flowers on the panel.


For the focal point, I am using a stitching die from Spellbinders. I die cut the stitching piece on pink cardstock. I stitched a lazy daisy on the holes using a white embroidery floss. I alternated the holes on where I stitched. On the holes without stitching, I stitched a straight stitch using a light pink embroidery floss. I added a pink gem on the center of the stitched holes. 

I die cut the shadow of the letter on blue cardstock. I embossed this piece using a dotted embossing folder. 

I adhered the stitched piece on the shadow die cut using liquid adhesive.

I heat embossed the word mom on green cardstock. I used the same embossing powder I used on the flowers. I fussy cut the word leaving a small border around the word. The stamp is from Lawn Fawn. I adhered this to the bottom portion of the stitched letter. 


I hope this project inspired you. Thank you for visiting my blog. Have a blessed, brilliant and creative day!

Maria Giselle B.

Blank Page Muse is generously offering a 15% discount to their online store to YOU, my blog readers. Just use the code BPMMaria when you check out. Enjoy!


Wednesday, May 8, 2024

Block Stamped Birthday Card


Hello! Welcome back to my blog. Today's card was inspired by a card created using a stencil with a block design. Instead of a stencil, I am using stamps to create a block design.

I used stamps from the Blank Page Muse Scribble & Scratch Mixed Media Set 2 Art Rubber Stamps. I arranged the stamps on a 4 1/4" x 5 1/2" white cardstock panel. I used different color of dye inks for each stamp. I masked the area around the image so I can blend the same color of dye ink to this part of the panel. I made sure that I am blending light handedly so that the stamped image will still stand out. I repeated this process until the whole panel is inked. 


For the sentiment, I used the Simon Says Stamp Groovy Happy Birthday die set. This set has a word and a shadow die. I cut the sentiment using both dies on black cardstock and used the negative cut created by both dies. I die cut 3 pieces so I can adhere this on top of each other for some dimension. Might be a bit tedious to do especially when it comes to the inside parts of the letters A, P, B, R and D. What worked for me on those tiny parts are a lot of patience, magnifying eyeglasses, a small tipped glue bottle and a pick up tool. Don't forget to use the positive letter die cut as a guide in placement of these letter parts. Lots of work but the end result makes you give yourself a big tap on the back.

I adhered the sentiment to the stamped panel. I applied shimmer to the sentiment die cut. 

I stamped a secondary sentiment on the bottom of the die cut sentiment. The stamp I used is from My Favorite Things.


I adhered a stitched frame to the panel for a pop of color.

This color block technique can be used with other stamp images. You can also create a bigger layout using this technique and use that panel to cover a notebook, to wrap a gift and even use it on a scrapbook layout. The possibilities are endless.

I hope I inspired you with today's card project. Thank you for visiting my blog. Have a blessed, brilliant and creative day!

Maria Giselle B.

Blank Page Muse is generously offering a 15% discount to their online store to YOU, my blog readers. Just use the code BPMMaria when you check out. Enjoy!


I am sharing this project at:

Sunday, May 5, 2024

Almost a One Layer Card


Hello! Welcome back to my blog. Today's project features the Kat Scrappiness Wok On stamp set. Isn't this stamp set stinking cute? 

I cut a heavy weight white cardstock at 4 1/4" x 11". I scored this on the long side at 5 1/2" to create a top folding A2 note card. 

I created a DIY stencil using the plastic insert from my son's broken accordion folder. I cut the plastic in half, measuring about 5" x 6". I die cut a square on the center of this plastic using one of the dies from the KS Never Ending Square Craft Dies. You might have to use a metal shim for the die to cut through the plastic. 

Using the stencil as a guide, I traced the square on the front of the top folding note card to create a grid of squares. This will guide me on where to stamp the images. 

I stamped an image on each square. I re-stamped the image on a masking paper. I fussy cut these images cutting it on the line. I used this mask to cover the images I stamped on the front of the card. I blended Tim Holtz Distress Oxide to each square, using different colors per square. I used two shades of each color per square, blending the colors together. I used the DIY stencil in blending the colors, taping it on the sides to avoid shifting. I covered the inner side and the back side of the card to protect it from any stray ink. But it is alright if you end up having inked portions on these areas. This just gives the card a handmade feel.


I flicked water to the blended area. I let the ink absorb the water, then picked the water with paper towel.


I lift the masking paper off the paper using a craft knife. I intentionally blended ink over the image on the blue square. My paper shifted while I was stamping this image. That's why I called this card an almost one layer card. It was the last image that I stamped. I did not want to repeat the process so I let it be. 


If you look closely, there is an area on the red and purple square without ink. To fix this, I adhered the mask back onto the stamped image. I lined the right portion of the mask to the stamped image on the card. This is when small blending brushes are very useful. I was able to do a touch up on these areas as you can see on the image below. 


I colored the images with Copic markers. While I color an image, I protected the other areas with a piece of paper while coloring. You never now if you drag colors with your hand while you color.


I stamped the image I used on the blue box on a light weight white cardstock. I colored this with Copic markers fussy cut it on the line. I adhered this on top of the inked image on the blue box. In this way, I was able to save this project. Nobody will ever know about this boo-boo except me and you.

I added accents to the images with a white gel pen. I did not add a sentiment to the front of the card. I wanted the focus to remain on the images.


I hope you like today's card and give this masking technique a try. Have a blessed, brilliant and creative day!

Maria Giselle B.

I added below links to the Kat Scrappiness products I used on this card. There will be no additional cost to you should you decide to purchase any of these products. While you are at the Kat Scrappiness website, do check out their wide array of products especially the exclusive Kat Scrappiness products. Enjoy!