Wednesday, August 31, 2016

Mickey Mouse Clubhouse Spinner Card


One of my friends asked me to create a card for his son's first birthday. This is an exciting milestone for a parent. Kind of reminds me on my sons' first birthdays, when you want it to be memorable. The challenge though is it has to be inspired by the Mickey Mouse Clubhouse, since this is her son's favorite and the theme for his party. She also requested an interactive card.


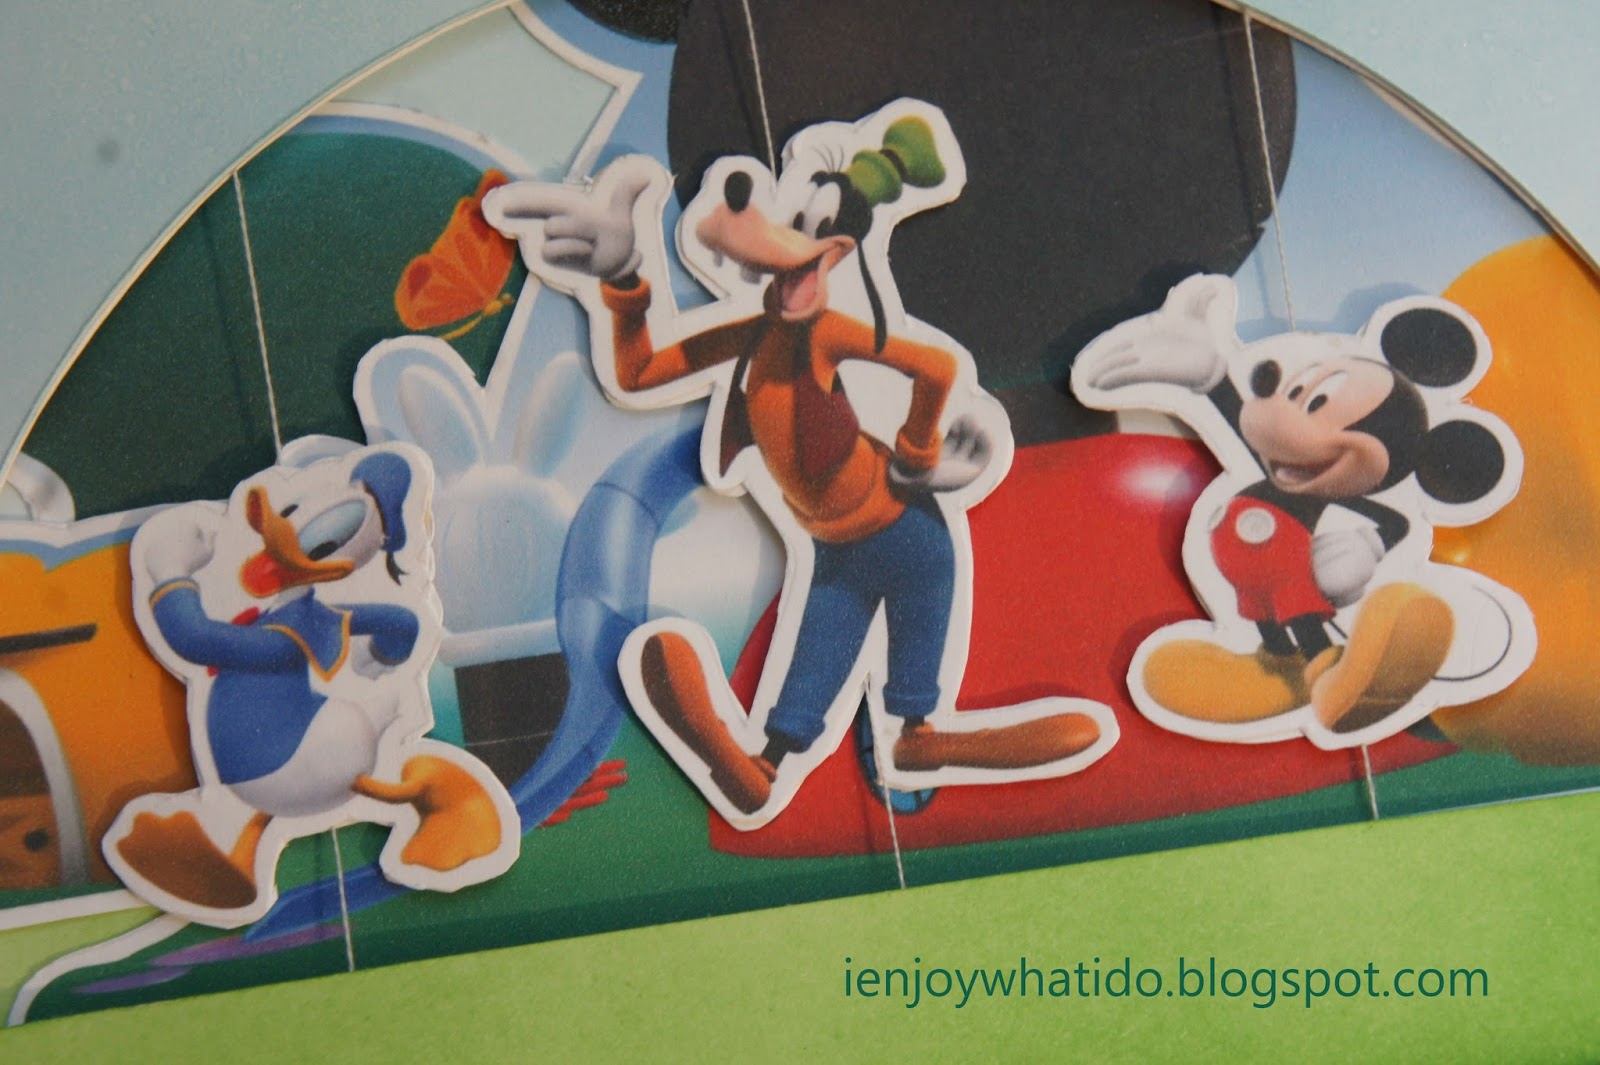
I was fortunate to download a Mickey Mouse Clubhouse board game pieces from the web. I resized the images, printed it and fuzzy cut it. I flipped the character images to create a window image. I adhered the same images back to back, sandwiching an embroidery floss in between the cut outs. I allowed these to dry with an acrylic block placed on top of it. I only cut the three characters the celebrant loves, Mickey, Donald and Goofy.

I cut 2 of 7" x 4 1/4" white cardstock and 1 7 1/2" x 4 1/4". I scored this last piece at 1/4" & 4". I masked these tabs. I blended these panels with Tim Holtz Distress Ink Broken China, Salty Ocean, and Mowed Lawn. I blended the colors to re-create the clubhouse's background. I covered the green part of the panel then spritz dissolved Ranger Perfect Pearl in water over the sky part of the panel. After this has dried, I cut a window to one of the panels. Do you still remember EK Success Curvy Cutters? I still have mines and it actually became handy to create the window. I cut an arched opening using the circle cutter but cutting it only halfway. I used a craft knife and ruler to complete the arch cut. I traced the window on another white cardstock and cut it off. The stringed characters were sandwiched in between the window panels.


I adhered the clubhouse to one of the inked panels. I embellished this panel further by adhering some of the images included in the file, which I also fuzzy cut.


For the back panel, I stamped the greeting using a Paper Smooches, Lawn Fawn and My Favorite Things stamps. I inked the top part of the letters with red ink and the bottom half of the letters with black ink. I use the Misti Stamping tool to stamp the letters repeatedly to make the color bold. I also used the Misti to ink the letters with Versamark ink so I can emboss it with clear powder.

I assembled the panels using a strong double sided tape. Below is a mini video on how the interactive card works.


Thanks for viewing my blog. Have a blessed & brilliant day!

Maria Giselle B.

I am sharing this creation to


Monday, August 15, 2016

Embossed Digital Stamp on Dura-Lar Film Shaker Card


I resized the image to 4 1/4" x 5 1/2". I prepared the area where I will print the image on with the anti-static powder tool. I printed the image on Dura-Lar Film using my ink jet printer. I immediately poured clear embossing powder to the image and heat embossed it. The film stood up to the heat of the heat gun. No warping at all.  For this project, I used Copic markers to color the image. I colored the embossed side but I plan to put the wrong side out when I assemble the card. I applied red stickles to the hearts and orange stickles to the orange flowers.


For the background, I die cut a 4 1/2" x 6" Strathmore Bristol paper using Taylored Expression Rolling Cloud die. I first laid out the dies and arranged it to how I want the clouds cut. I secured the dies with tape and die cut the paper. I slightly offset the dies to create various alignment. I came up with a total of 5 pieces. The technique used in my background is inspired by a video tutorial by Stephanie Klauck for MFT Stamps (Whimsical Waves Background.) As what Stephanie did, I inked each piece with a different color. I used Tim Holtz Distress Ink Salty Ocean, Peacock Feathers and Broken China. I adhered these pieces to a scrap piece of cardstock making sure all the pieces are aligned, just like puzzle piecing all the pieces. I spritz water onto this panel, allowed the water to seep in, then dabbed the water off with a paper towel. This technique created some texture on the ink blended background. I then spritz this panel with Ranger Perfect Pearl diluted in water using a mini mister.

To create the shaker element, I wanted to use a scalloped rectangle frame to cut an outline and also cut the cardstock layers for the shaker part. I can't find the right rectangle frame in my stash to do this job. The closest is SSS Frames Craft Die. The scalloped rectangle die that comes in this set cuts out a very narrow scalloped frame. Instead of using cardstocks to stack on top of another, I cut small strips of foam adhesive. I did doubled up on the foam adhesive for more space for the shaker elements to shake. I also used this die to cut the cloud panel to unify the scallop edge on all layers of the shaker card.

I cut the Dura-Lar Film with scissors using the negative curved rectangle cut as guide. I left a bit of a margin at the edges when I cut the film. I adhered this to a purple scalloped rectangle die cut using liquid glue. I adhered the double stacked foam tape. I rubbed a used dryer cloth to the film to decrease the static. I also used the anti-static powder tool on the edges of the foam to lessen the cling of the shakers to the sticky foam.

I poured some Martha Stewart and Simon Says Stamp sequins to the cloud panel. I adhered the film panel on top of this. I made sure the scallops are aligned before I applied firm pressure to adhere both panels together. Now, the shaker portion is done.


The die is smaller than a regular A2 card so my card base measures 4" X 5 1/4". I adhered the shaker element to this note card.


For the sentiment, I die cut a purple cardstock using Lawn Fawn Thinking of You die. I adhered a double sided tape to the back of the cardstock first before running this through the die cut machine. I have to run it a couple of times to make sure it cuts all the way. The good thing about this die cut is the ability to manipulate it. I curved the sentiment die cut to fit the space in the bottom. I used a Spica Clear Glitter pen and wrote over the letters of the sentiment die cut to add some sparkle to the die cut.

Thanks for viewing my blog. Have a blessed & brilliant day!

Maria Giselle


Image Sponsor

Thursday, August 4, 2016

WPlus9 Pretty Peonies Card In A Box


I wanted to create a card that I would hopefully see on my manager's desk and my sons' teacher's desks, since school opening is coming up soon. I thought this card in a box is a perfect project for that mission.

When we were on vacation, I brought limited craft supplies. It includes 2 stamp sets (both layering stamp sets), 6 regular sized ink pads, 3 mini cube ink pads (which I think is great for traveling), cardstock, 3 acrylic blocks, stamp cleaner (I was going to practice layered stamping), 2 printed digital stamp images, and a marker set. Because of these limited supplies, I was able to practice my layered stamping which I am struggling with. I stamped each image with enough spacing in between so I can die cut these images once I got back home.


The difficulty in die cutting these WPlus9 images is that the die comes as a solid piece unlike other metal dies which comes as an outline, making it easy to line it up with the stamped image. I think, it would have been easier if I die cut the cardstock first, then stamped the image on it to get perfect alignment. Oh, well. Too late for that and I don't want to waste the sheets of stamped images I already made. So I just lined the die to the image to the best that I can. It is not a perfect cut but the artistic touch of the image makes the uneven cut tolerable.

There are lots of tutorials for card in the box online. The one that I find most helpful and easy is from http://www.thenoncraftycrafter.com.  Narelle created a file in Cricut Design Space for a card in a box which includes the box, the insert, the layers and even an envelope! Just like Narelle, I only cut the box, the insert and the envelope using the CDS file. I used an old Doodlebug Design patterned paper for the layers.

I cut strips of acetate to attach the die cuts to. I used mini-Glue Dots to adhere the die cuts to the acetate. I think the key to creating a card in a box is to have plenty of elements for embellishment. Once I am satisfied with how my card looked, I worked on the sentiment.


If I will recreate this card, I would have not adhered the front tab paper until I have a plan on how to add a sentiment. I would have stamped the sentiment onto this front tab paper then adhered it the front tab. But since everything is adhered. I cut a vellum to heat embossed the sentiment to. To adhere this, I applied dots of liquid glue to the back of the vellum, where the letters are embossed. The sentiment is from Li'l Inker Design Greetings & Salutations stamp set.

For the envelope, I cut a patterned paper bought from Michaels using the file mentioned above. I cut off a bit of the flap to make it even when it is folded. Since I am on the CDS, I went ahead and wrote the recipient's name using Ranger Embossing pen. Yes, it fits in the Cricut Explore. I embossed this with black embossing powder.

Thank you Narelle for sharing a very helpful CDS file! Thank you for visiting my blog. Have a blessed & brilliant day!

Maria Giselle B.

I am sharing this creation to


Monday, August 1, 2016

Copic Colored Sasayaki Glitter Bedtime Teddy Digi Stamp


I have to color at least one of the images provided by Sasayaki Glitter. The images are very cute and irresistible to color.


The colors I used are listed below. Have you ever used the 0 marker to create accents to your Copic coloring? I loved the way the dots were created using the 0 marker. It pushed away the blue color to create this effect. Very cool. I used the same technique on the ground.

I die cut the image using an MFT Circle Stax die. I stamped the sentiment using Memento Tuxedo Black ink. I colored the sentiment. The sentiment is from Impression Obsession Love You Miss You stamp set.

I wanted to create a CAS card, which I rarely do. My initial plan was to adhere the colored panel to a white note card that I will barely embellished. Well, I ended up with a layered card because I decided to use a stencil and spray to embellish the note card. Despite taking extra care not to ink the back of the card, I did manage to smudge some ink on it. What's so funny is that it is not even one of the spritz color I used for this card. I must have reactivated a dried ink from the cardboard from the spritzing. I used a Tim Holtz Star Layered Stencil and Prima Color Bloom Spray Mist in Storm Cloud and Soft Teal for this technique.

I sprayed the gray mist on one side of the stencil and laid that over the white cardstock panel. I pounced on this with a rag to let the color seep through the cardstock. Without lifting the stencil, I spritz the teal on the stencil. When I removed the stencil, it created this two tone background that looks very cool. I wish I captured it well enough in the photo. The gray somewhat pooled around the negative spaces to create an outline for the stars created by the teal spray. The Prima Color Bloom Spray Mist also has a bit of shimmer, adding more awesome effect to the panel. I encourage you to give it a try.


After I dry this with a heat gun, I trimmed off a bit from the edges. I adhered this on the card base. i adhered the image slightly to the left of the card. I trimmed off the excess. I decided to add some glitter towards the pompoms of the sleep hats. I applied glue and poured some Elizabeth Crafts Cool Diamond Silk Microfine Glitter over it. After the glue has dried, I rubbed my finger onto the area to activate the sparkle of the glittered powder. I also accented the eyes using a black Sakura Glaze pen.

Thanks for visiting my blog. Have a blessed & brilliant day!

Maria Giselle B.

Copic markers used:
Bear E31, E33, E35
Nose E000, E01, R00
Pajama B63, B66, B69
Dog E53, E55, E57


Image Sponsor

Copic Colored Atelier Mermaid Digi Stamp


This image is very pretty and needs a lot of patience to color. The colored image in this card is my second colored image. I messed up fuzzy cutting the first one. I was trying to cut it on the line but later on realized that this is kind of hard having her hair twirled here and there. So with the one in the card, I left a small white border around the image. Believe it or not, I wasted more cardstock trying to cut the shell-shaped card with the Cricut Explore.

I started off by printing the image, then coloring it with Copic. The colors I used are listed at the bottom of this post. I was trying to color the mermaid like Ariel, The Little Mermaid. I searched the web for any Copic coloring of Ariel but nothing popped up. I colored her my Ariel way. When I showed the colored image to my sons and asked them who the mermaid is, they all answered Ariel. Their approval is good enough for me.

I applied clear Wink of Stella to the star and flower accents on the mermaid's hair, and to the mermaid's fin. I emphasized the eyes with a dot of white Sakura Gelly Roll pen. I  added some dots of black Sakura Glaze Gelly Roll pen on the flowers. I covered the blue flower with Ranger Glossy Accents and allowed this to dry.

I cut the shaped card with the help of the Cricut Explore. The image is from Cricut Create A Critter. I used the digital canvas of the Cricut Design Space to help me size the shell. This cut image only comes with two layers. I duplicated the base layer and welded two images to create the base card. I cut the top layer using a pink patterned paper. I cut the bottom layer using a light blue cardstock. I cut the shell-shaped cardbase using kraft cardstock. 

As I've mentioned, I have a lot of scraps with this project. I needed a ground for the mermaid to lay on so it doesn't seem like she's floating. I cut one of the scrap shells and heat embossed it with gold Wow! Ultra High Embossing powder. I embossed this twice to make it really raised.

For the pink layer, I inked this with Tim Holtz Distress Ink in Old Paper & Tea Dye. I dry embossed the blue layer using Lifestyle Crafts Jubilant embossing folder. I inked the edges using TH Distress Ink in Peacock Feathers. I adhered some glittered tape onto the blue layer, long enough to show through the slits on the pink layer.

I adhered the gold embossed layer onto the pink layer using Skor-tape. This layer needs a strong adhesive due to the weight of the embossing. I adhered the mermaid on top of this using foam adhesive for dimension. I adhered the pink layer onto the blue layer. I added a twine on top of the shell. I used a Lawn Fawn Gold Sparkle Trimming. I taped the twine on the back to keep it secure. Once I am happy with the bow, I squirted Ranger Multi Matte Medium glue on the knot. I dried this by clipping it with a tweezer. I also adhered clear Pretty Pink Posh sequins randomly to the lay-out. Once this is dry, I adhered this panel to the kraft shell-shaped card base.

For the sentiment, I combiined sentiments from Hampton Arts Doodlebug Design Clear Word Greeting stamp set and Avery Elle Peonies stamp set. I heat embossed this using   white Hero Arts embossing powder. I embossed this on a pink vellum strip. I adhered the end of this strip to the bakc of the embossed piece using mini glue dots.


Thanks for visiting my blog. Have a blessed & brilliant day!

Maria Giselle B.

Copic Markers used:
Hair-YR04, YR65, YR68
Skin-E000, E01, E11, E21
Fin-YG03, YG13, G07, G12, BG15, BG34
Eyes-BG01
Flowers-Y00, BG01, BG05
Star-Y04, Y08, Y35
Sand-E31, E51, E53

Image Sponsor

I am sharing this creation to: